Set up Octotor, step by step.
Follow this guide from top to bottom and you end up with a working system: installed, licensed, connected to your first computers and collecting their details. No prior Octotor knowledge needed.
What tours are. A tour walks you through a real task, click by click, on the pages of a live demo copy of Octotor. It opens in a new tab and changes nothing on your own installation. Every step in this guide that has a matching tour shows a Tour button next to its title, like the one here. Click it to watch the step done in the demo before you do it yourself. Start with the overview:
Tour — The setup journeyThe journey at a glance
Getting Octotor working is three short parts — install it, create the first objects it needs, then prove the connection and bring your computers in. Everything after that (schedules, alerts, notifications, access control) is covered in the Post-Setup Guide, once the system is up.
Contents
Before you begin — where will Octotor run?
This guide assumes the common case: Octotor runs on one VM inside your network, and can reach the computers it manages directly (ping them, connect to them).
Two other setups exist, and are not covered here:
- Octotor on a server outside your network (a cloud VPS), connected to your site through Tailscale or a similar VPN — the install is the same, but the network setup differs.
- One Octotor managing several companies (MSP use), where two customers may use the same IP ranges — Octotor solves this with NetMap; see the product Help.
For both, use the product Help (the ? button in the app). Dedicated guides will follow.
Before you begin — Octotor is agentless
Octotor installs nothing on the computers it manages — no agent, no service, no footprint. It connects the same way an administrator would: WinRM for Windows, SSH for Windows or Linux. So the only thing a computer needs before Octotor can manage it is:
- WinRM or SSH switched on, and
- accepting connections from the Octotor VM's IP address.
Most Linux servers already run SSH. Windows machines usually need WinRM switched on once — the how-tos are at the end of this guide: enable WinRM on Windows · enable SSH on Windows.
1Prepare a VM
You need:
- An empty Debian 13 VM — nothing pre-installed. Sizing is on the requirements page.
- A user that can run sudo.
- Internet access from the VM (the installer downloads Octotor from our servers).
- Your install token — you got it by email when you registered, together with a ready-to-run install command.
Debian doesn't come with the download tool the next step uses, so install it first:
sudo apt install curlWhat you should see: apt installs the curl package and returns to the prompt.
2Download, verify, install
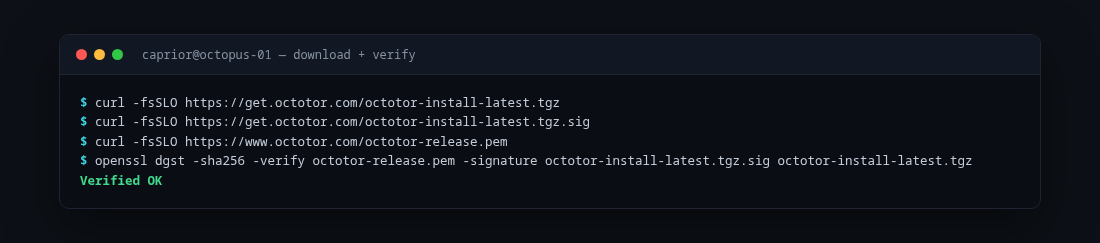
Run the five commands below in the VM's terminal, one at a time, in this order. Each command has a copy button and a note telling you what to expect. The first three download the installer and its proof of origin. The fourth checks the download is genuine. The fifth starts the install.
Command 1Download the installer package
curl -fsSLO https://get.octotor.com/octotor-install-latest.tgzWhat you should see: no output — the file downloads quietly and the prompt returns.
Command 2Download its signature
curl -fsSLO https://get.octotor.com/octotor-install-latest.tgz.sigWhat you should see: no output, prompt returns.
Command 3Download our public key
curl -fsSLO https://www.octotor.com/octotor-release.pemWhat you should see: no output, prompt returns.
Command 4Verify the download is genuine
openssl dgst -sha256 -verify octotor-release.pem -signature octotor-install-latest.tgz.sig octotor-install-latest.tgzWhat you should see: exactly one line — Verified OK. If it prints anything else, stop here and contact us; do not run the next command.
Command 5Unpack and start the install
Replace the two placeholders first: <your-token> is the install token from your registration email, and <your-name> is a short name for this installation (your company name is fine):
tar xzf octotor-install-latest.tgz && sudo bash octotor-install.sh --token=<your-token> --customer=<your-name>What you should see: the installer starts printing numbered stages (1/12, 2/12, …).
The separate verify step exists so that nothing runs on your machine before you have seen Verified OK. A shorter one-line install variant is on the deploy page; it asks for your token while it runs.
3Let the installer work
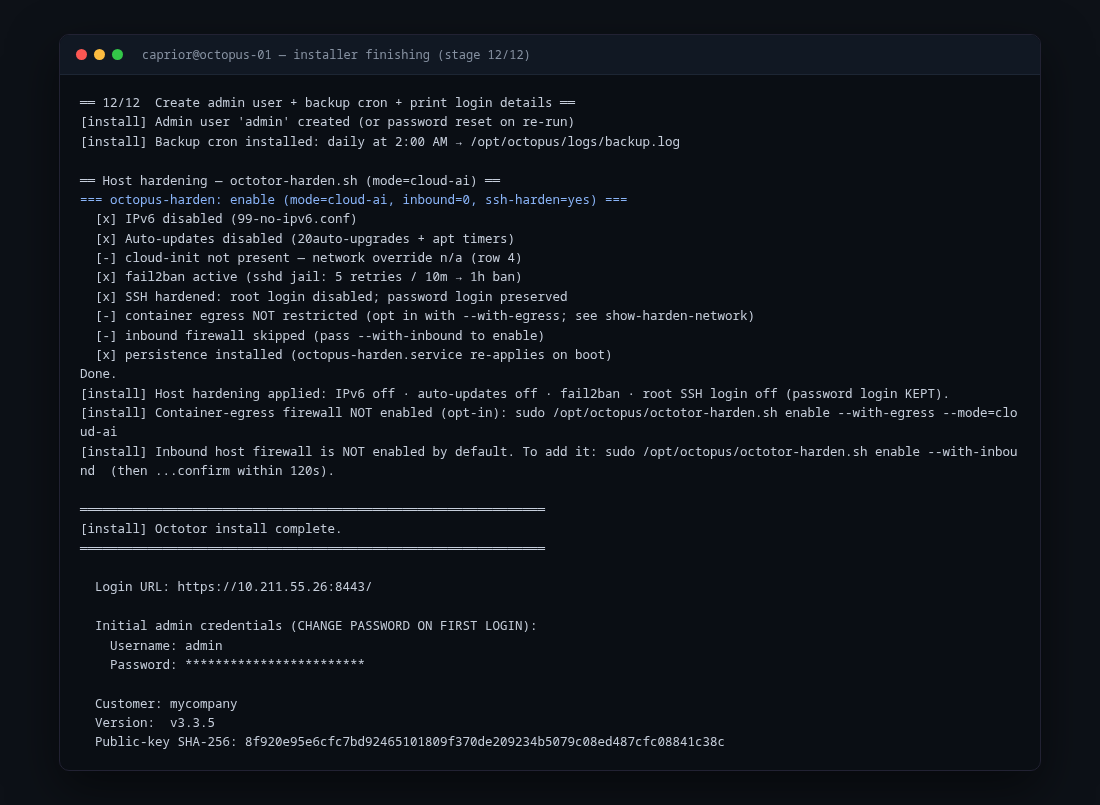
The installer does everything itself, in 12 numbered stages: it installs Docker, checks the signature of every Octotor component before running it, starts the system, applies security hardening to the VM, creates your admin user and sets up a nightly database backup. It takes a few minutes (most of it is downloading).
At the end it prints how to log in:
Keep this address — it's how you and your team open Octotor from now on. If the installer stops with an error about a signature, that is the safety check doing its job: nothing was installed. Contact us.
4Log in for the first timeTour
- On your own computer, open a browser and go to https://<your-vm-ip>:8443/ (the address from Step 3).
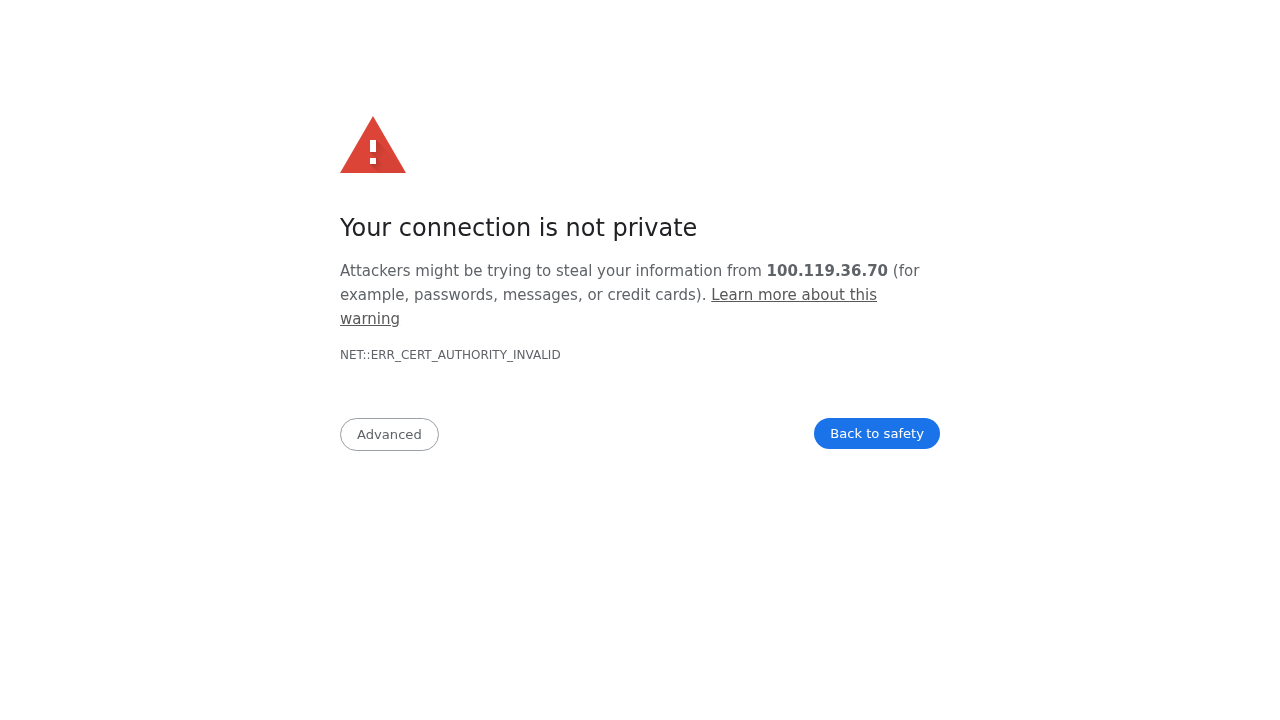
- The browser warns about the certificate — expected on a fresh install (Octotor made its own certificate; you can put a proper one in later). Click Advanced → Proceed.
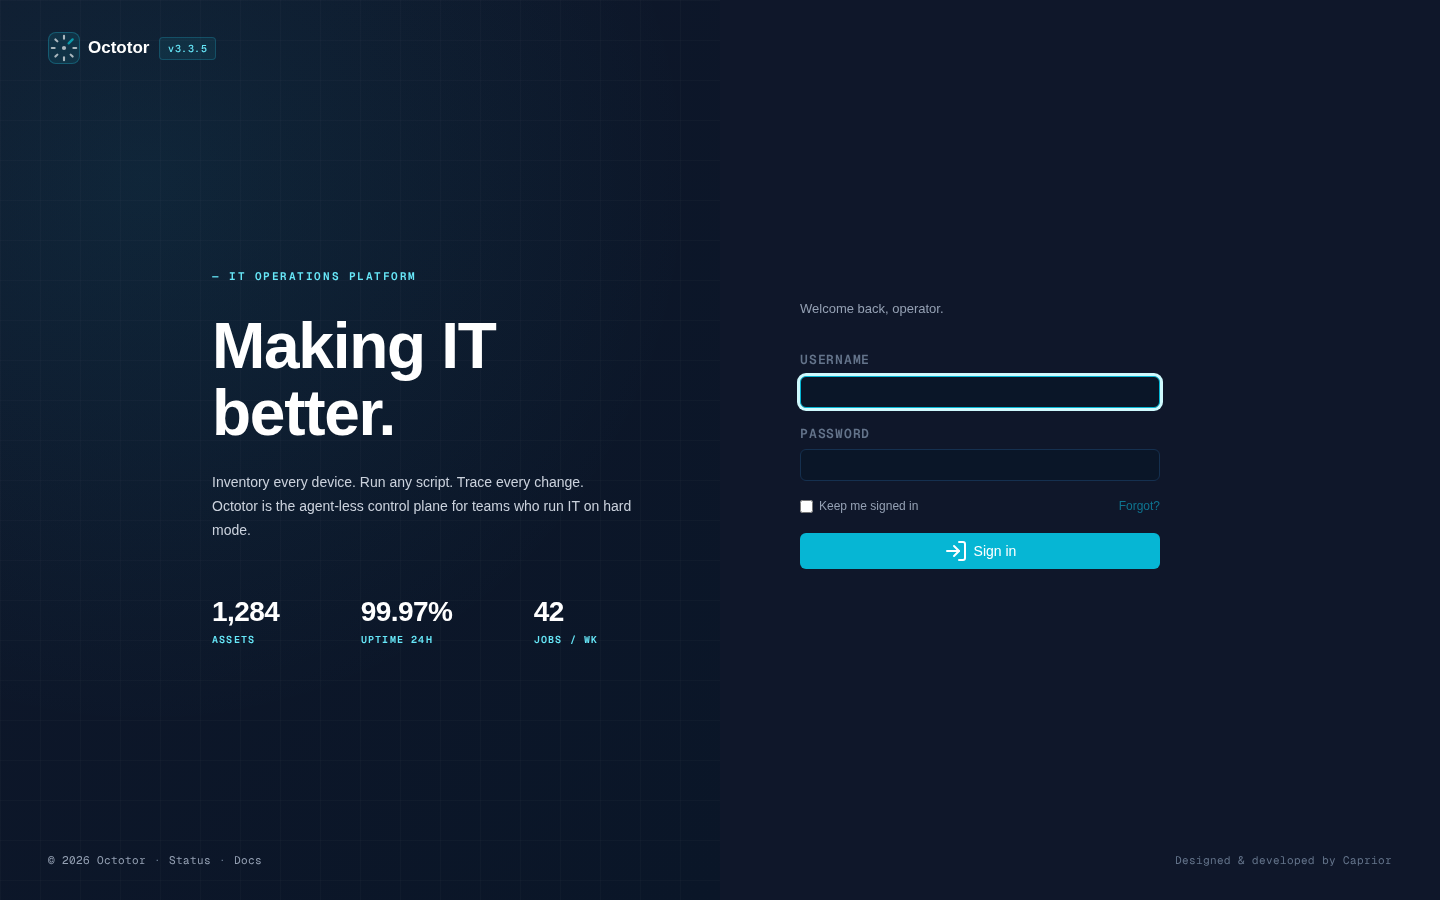
- Log in with username admin and the password the installer printed.
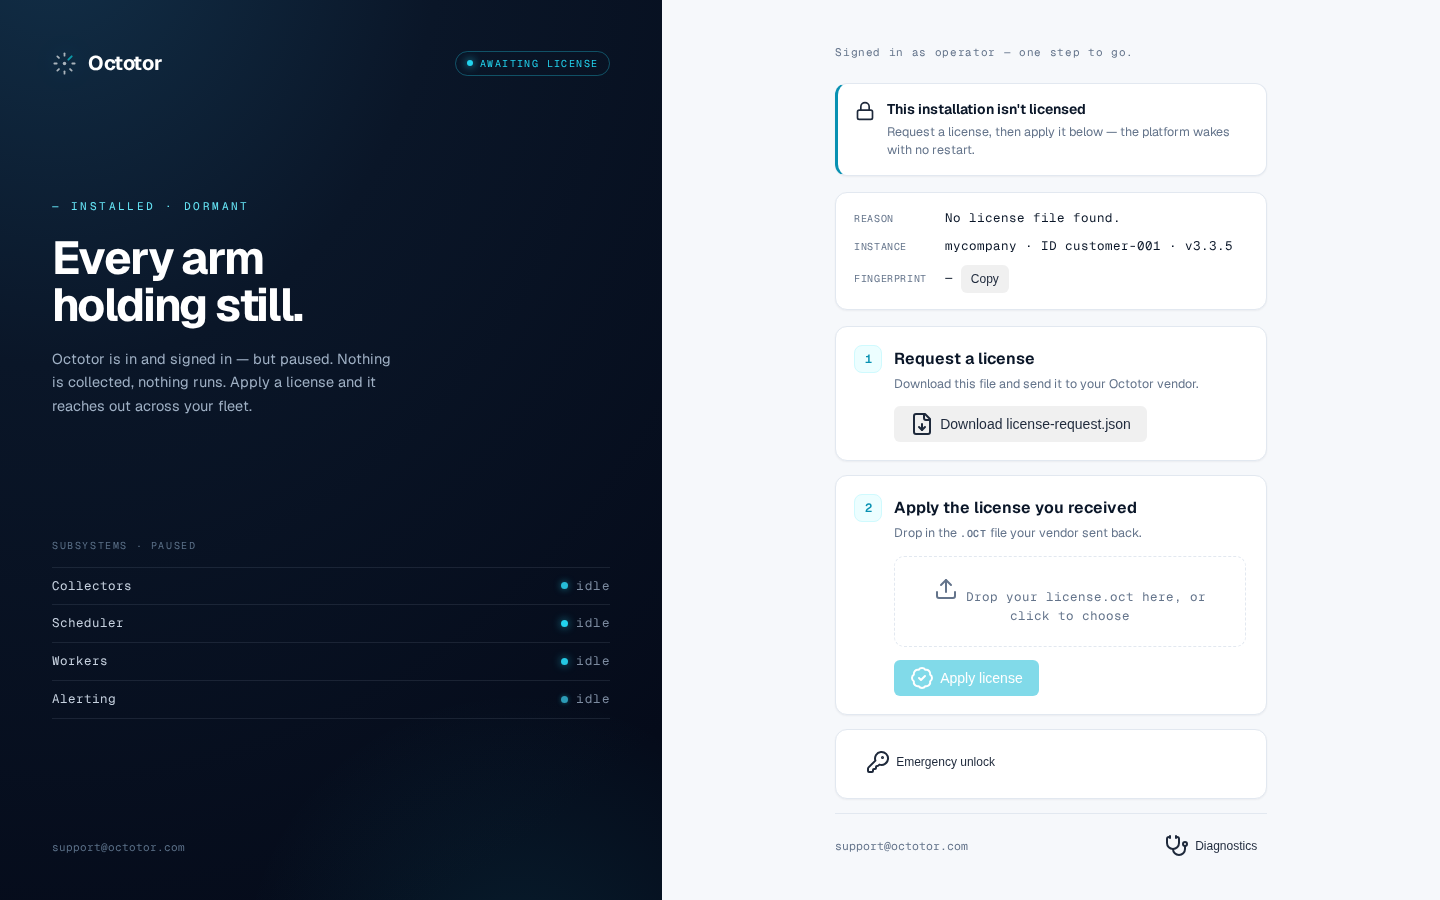
You land on the activation page — a fresh Octotor starts without a license, and until one is installed it does nothing else. That's the next step.
5Install your license
Every Octotor — including the free Community edition — runs on a license file. Two short actions:
- Send us your request file. On the activation page, click Download license-request.json and email the file to licensing@octotor.com. It identifies this installation (and nothing else) — your license will only work here.
- Install the license we send back. You'll receive a file called license.oct. Drag it onto the activation page and click Apply license. Octotor checks it and loads straight into the app — no restart.
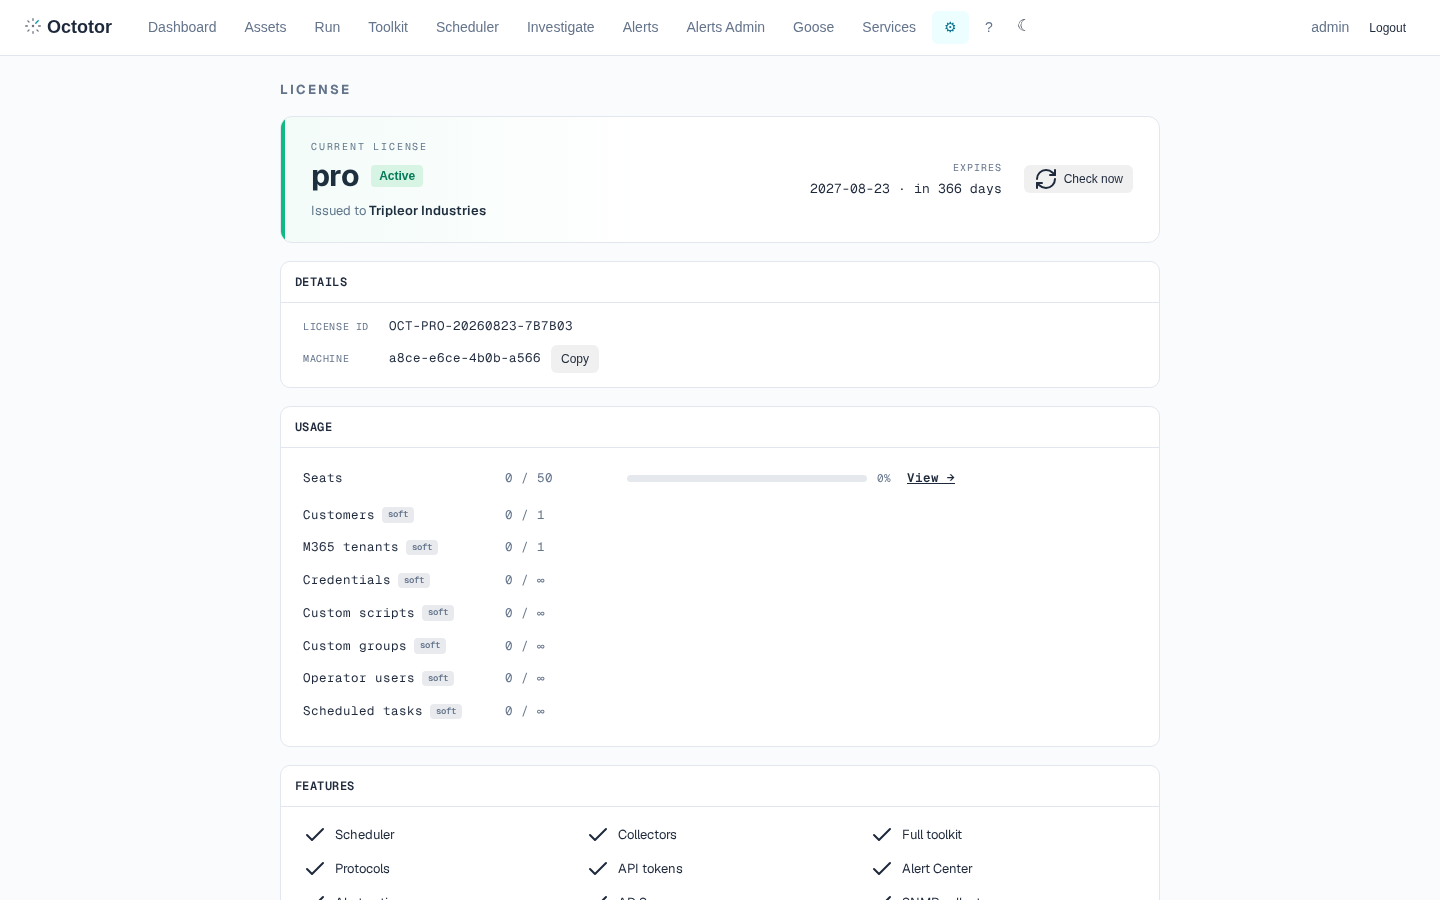
You can see your license anytime under Settings → License: what edition you have, when it expires, and how much of each allowance you're using.
6Change the admin passwordTour
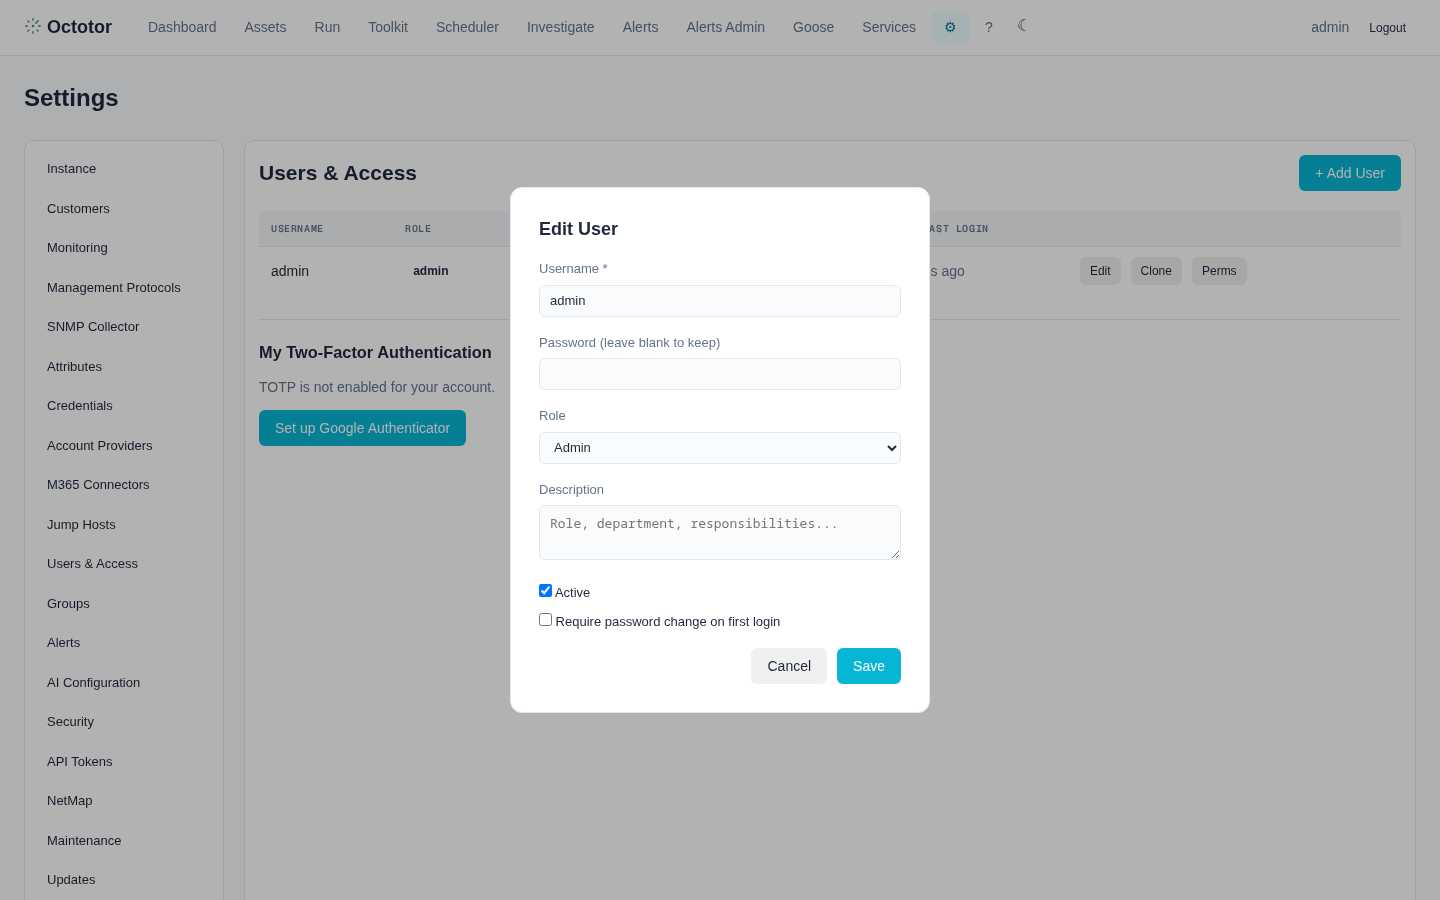
Now that the app is open, replace the installer's password with your own before anything else:
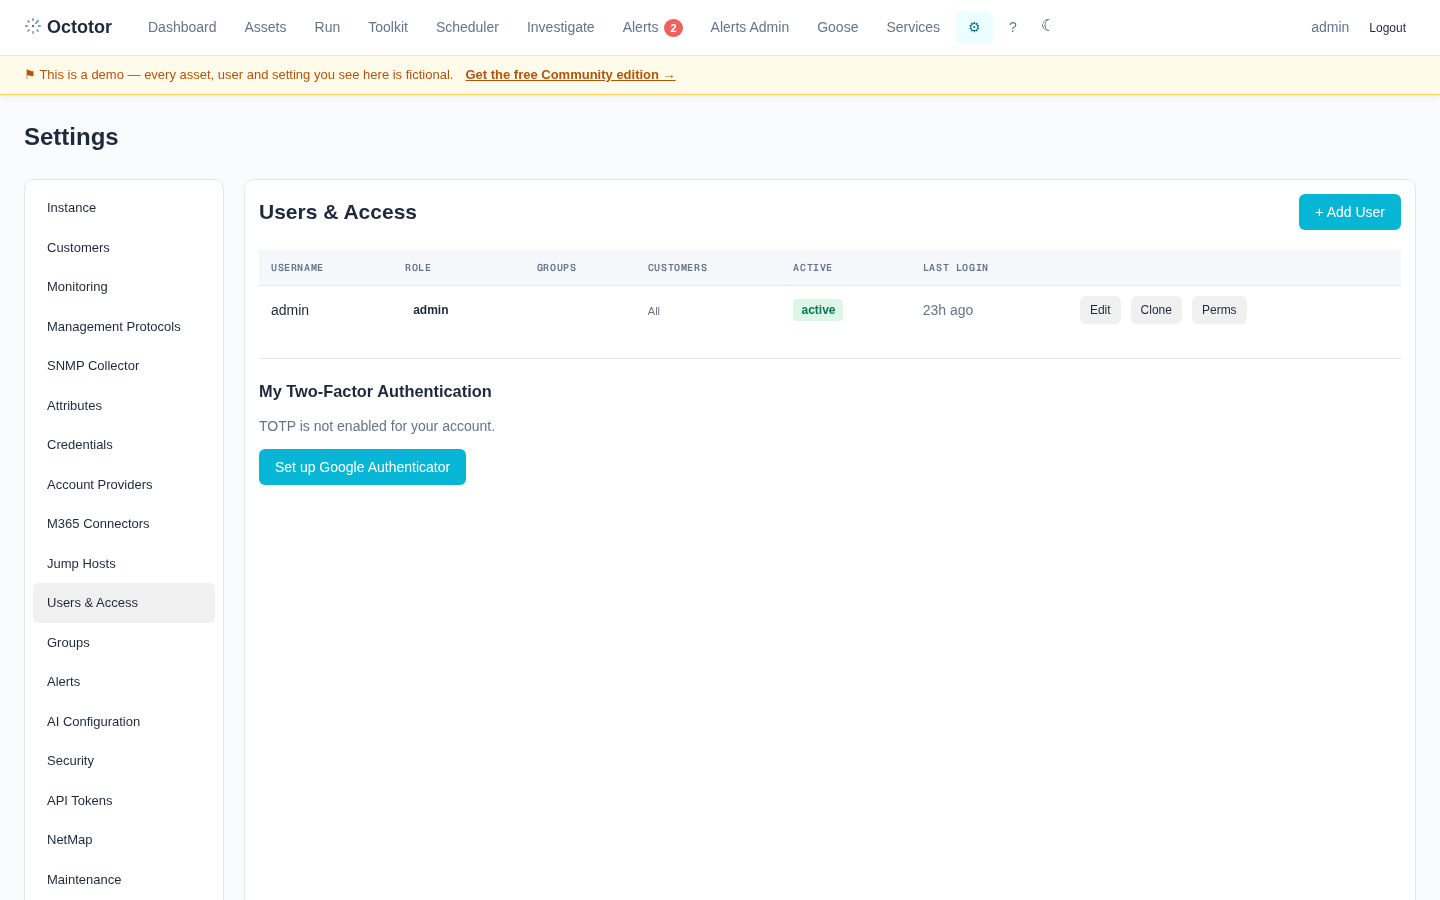
- Click Settings (the gear icon in the top bar).
- Click Users & Access in the left list.
- On the admin row, click Edit, set a new password, and Save.
7Create your first customerTour
In Octotor, every computer belongs to a customer. If you only manage your own company, create one customer with your company's name.
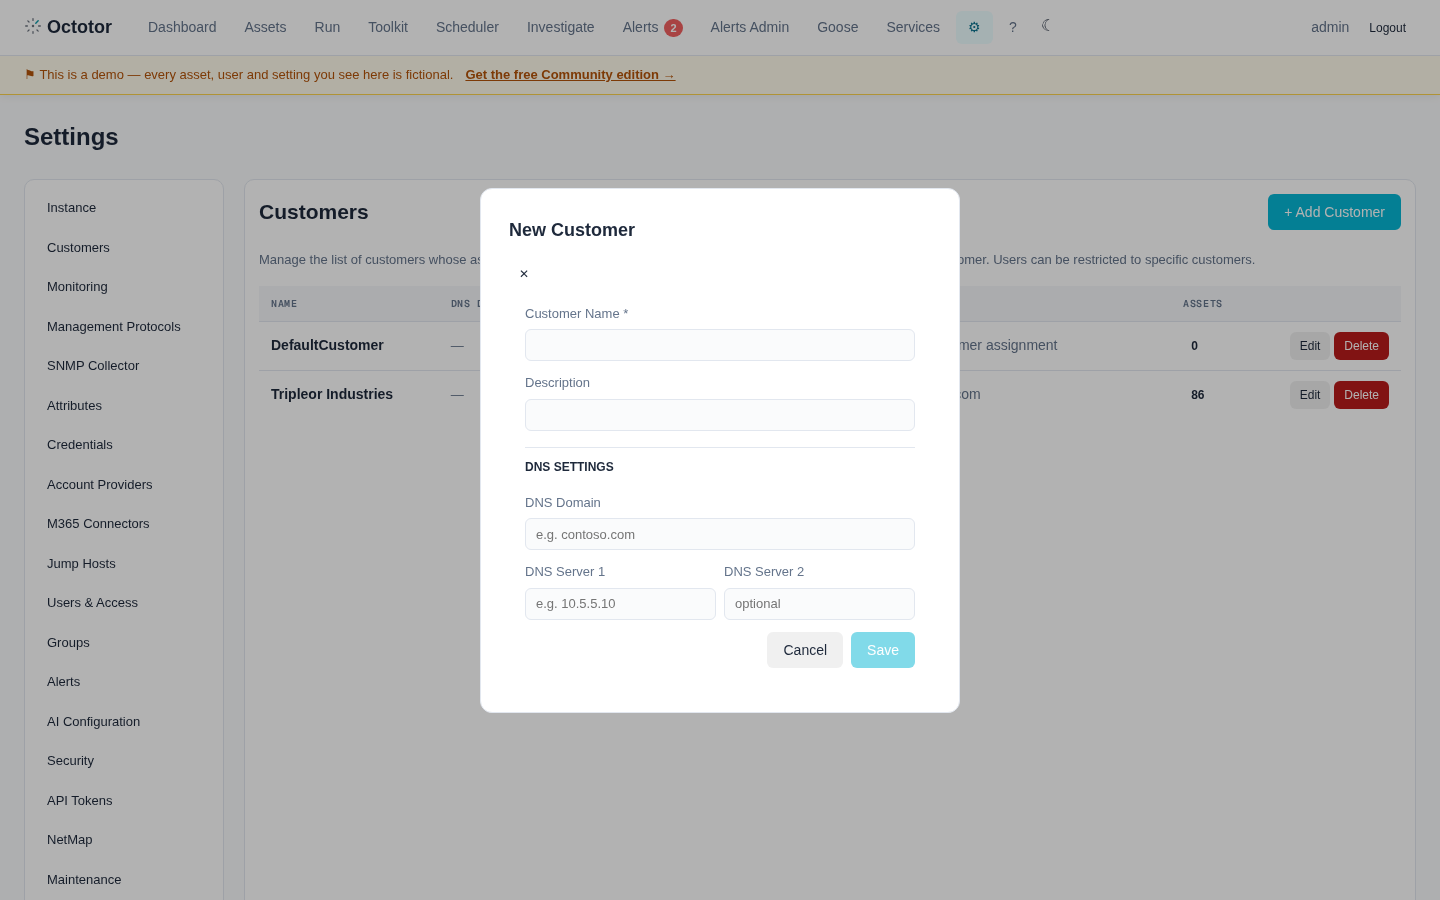
- Click Settings (gear icon) → Customers.
- Click + Add Customer.
- Customer Name — the company name (required).
- Under DNS Settings, enter your DNS Domain (e.g. yourcompany.local) and your DNS Server address — this lets Octotor find computers by name.
- Click Save.
8Add credentialsTour
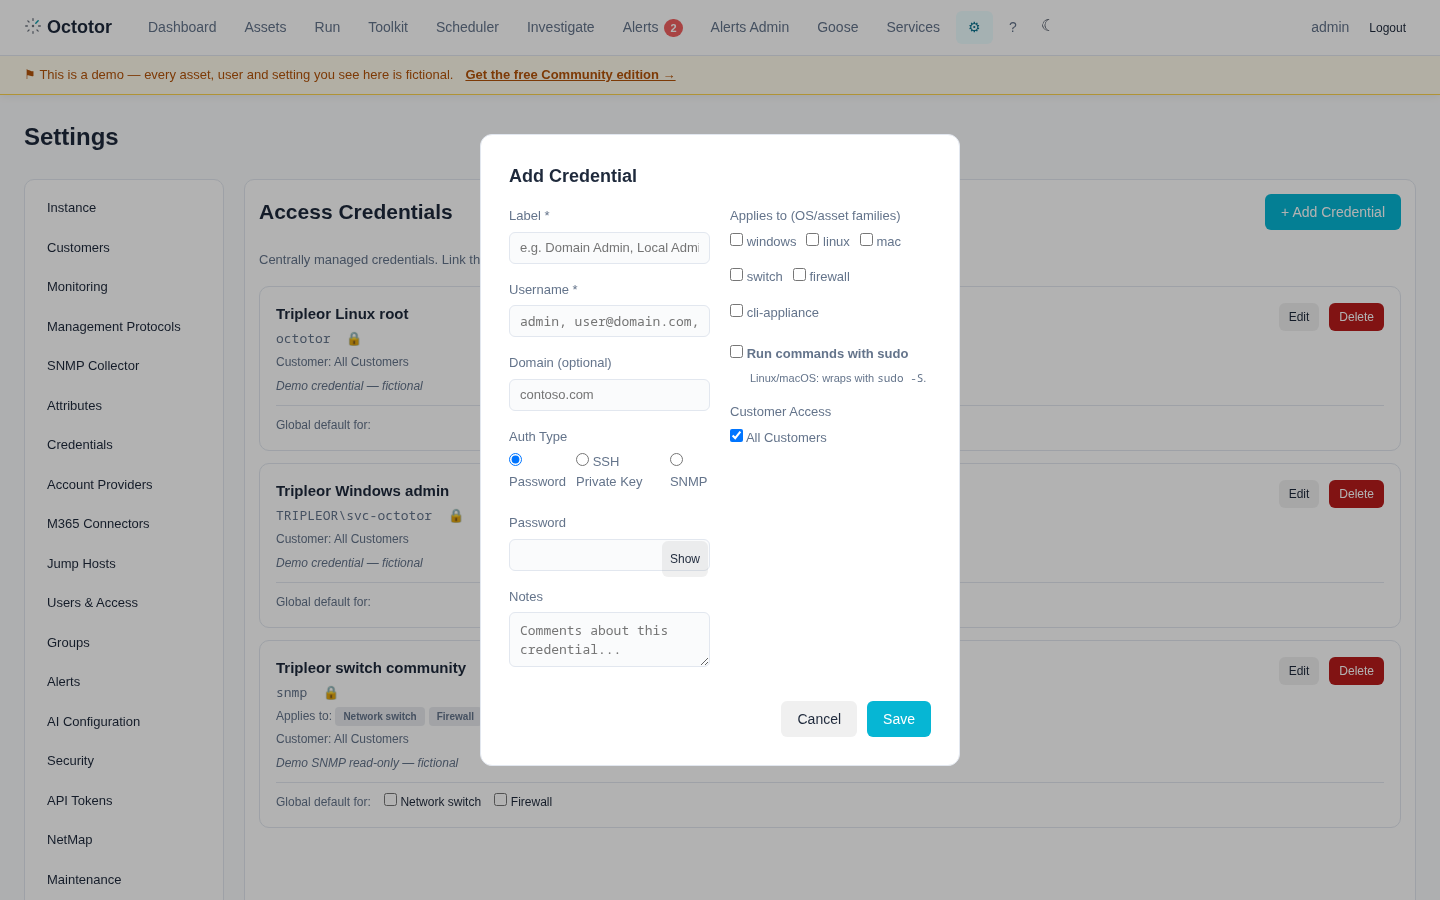
Credentials are the accounts Octotor uses to connect to your computers. They're stored encrypted. You need two to start:
- Click Settings → Credentials → + Add Credential.
- Create a Windows credential: a domain account with admin rights on your Windows computers (or a local admin account that exists on all of them).
- Create a Linux credential: an SSH user for your Linux servers — password or key. If scripts need root, turn on the sudo option.
- On each credential, set it as the default for its OS — then every task picks the right account by itself.
9Add your first computerTour
Manually add a computer to Octotor. It can be any Windows, Linux or macOS computer. Your Domain Controller is the best first computer to add: once Octotor can talk to it, it can discover everything else for you (Step 11). The steps below use the DC as the example.
First, make sure the door is open on the computer itself: Octotor will connect to it over WinRM (the standard way for Windows) or over SSH (Linux, macOS, or Windows if you use SSH there). If neither is enabled yet, do that now — enable WinRM on Windows · enable SSH on Windows (most Linux servers already run SSH).
Then add it:
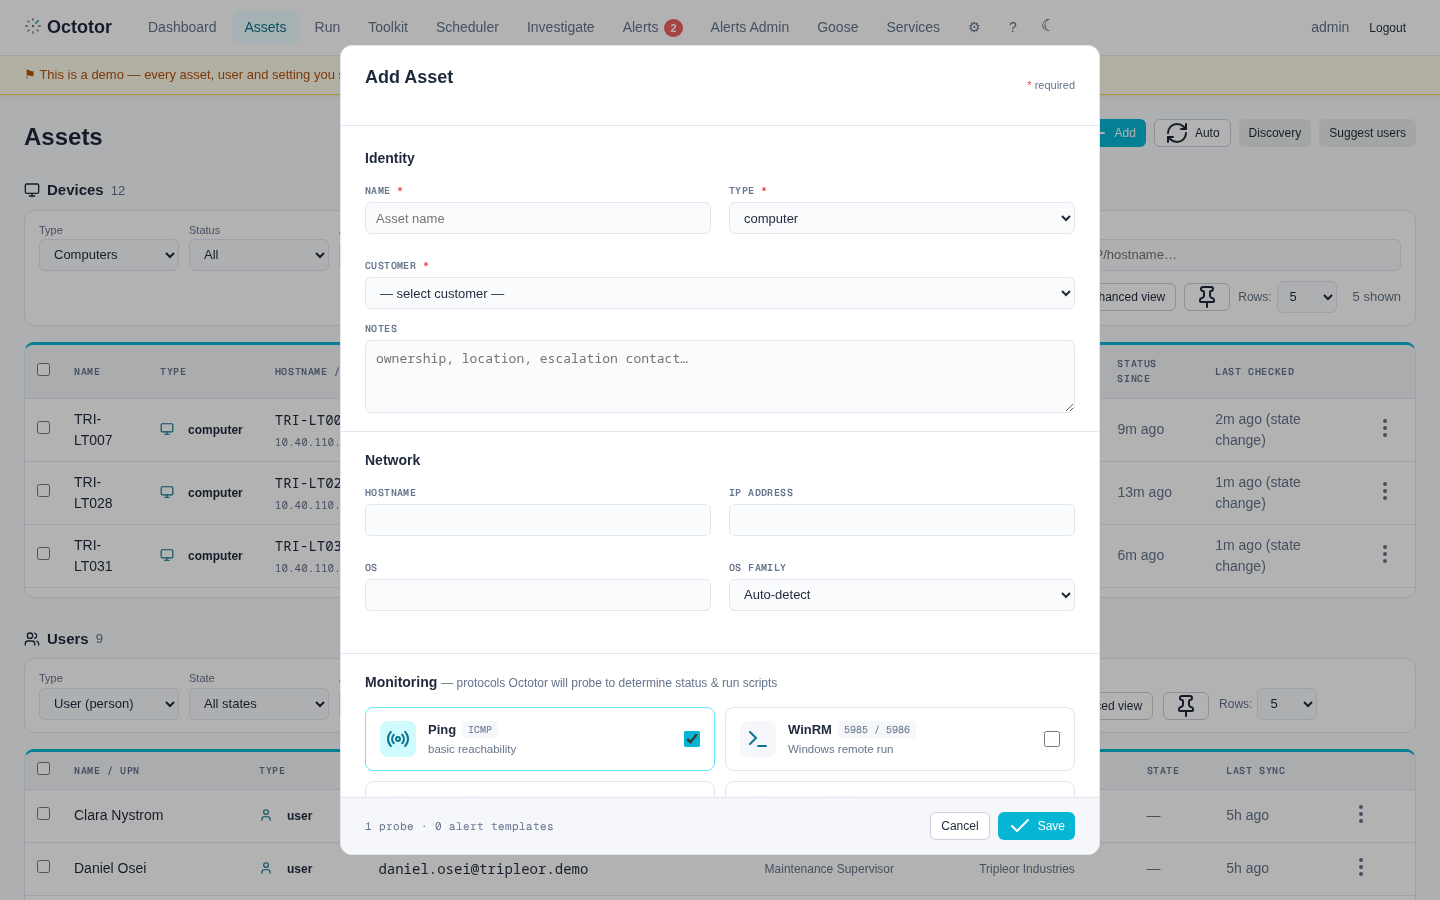
- Open Assets and click + Add (top right).
- In the Identity section: Name — the computer's name (e.g. DC01). Type — computer. Customer — pick the customer you created in Step 7.
- In the Network section: fill in the Hostname and IP address, and set OS family to match the computer — Windows for the DC.
- In the Monitoring section, Ping is already selected — it tells Octotor to check regularly that the machine is up. Additional monitoring options are configurable here; for now, leave them as they are.
- Click Save.
10Check the whole chain with one test script
Before going further, prove that everything between Octotor and a computer actually works.
Step 10.1Confirm the computer accepts remote management
WinRM (or SSH) must be enabled on it — you did this at the start of Step 9. If you skipped it, do it now: enable WinRM on Windows · enable SSH on Windows.
Step 10.2Understand what is being tested
Four links have to hold, every time, for any computer:
Step 10.3Run the testTour
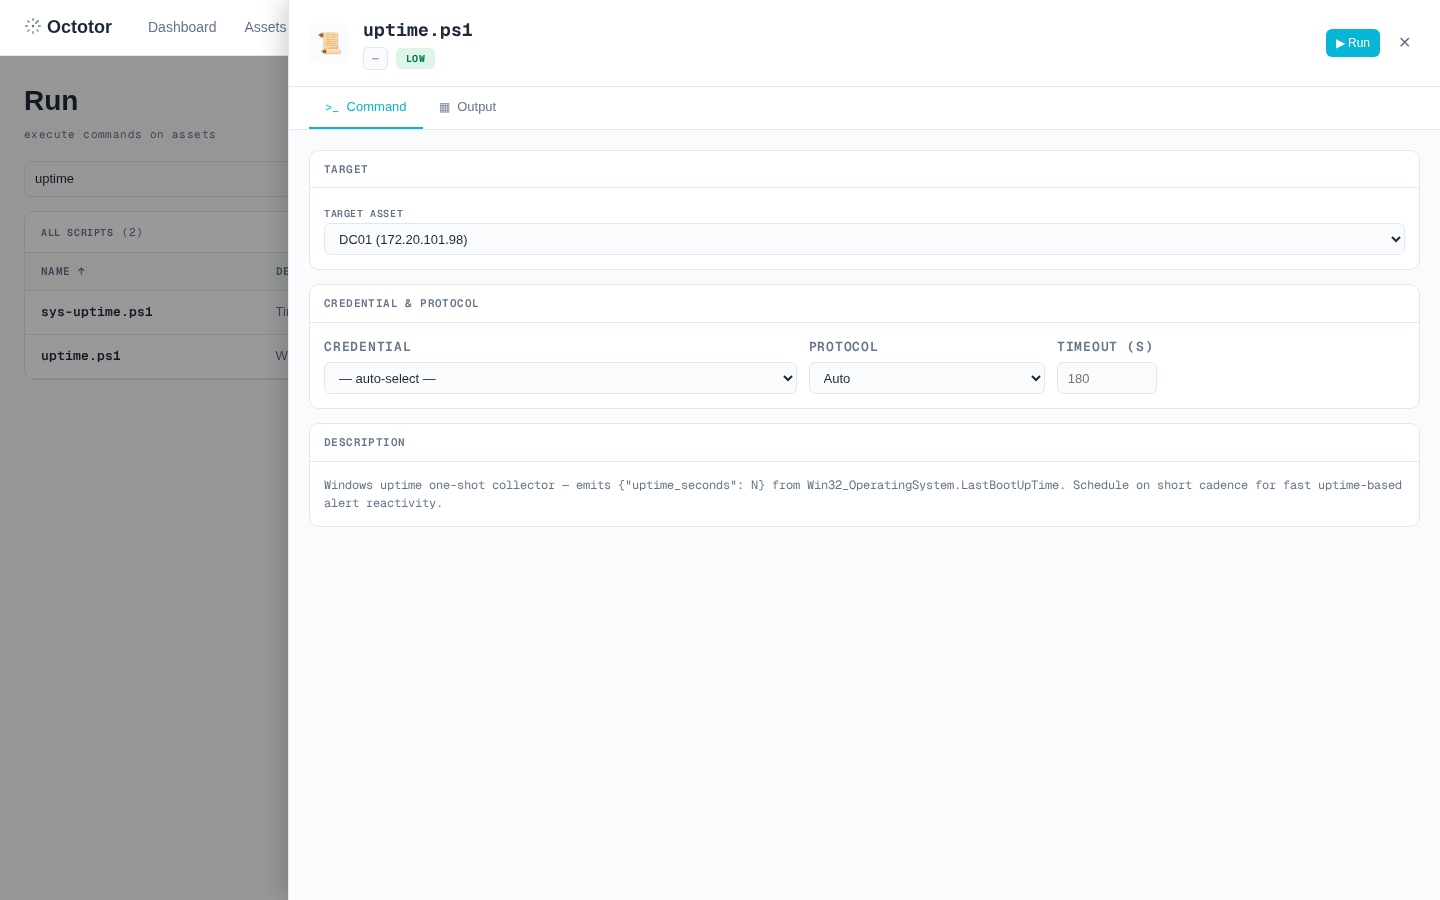
The uptime.ps1 script only asks the computer how long it has been running — it changes nothing. Run it against your DC:
- Open Run.
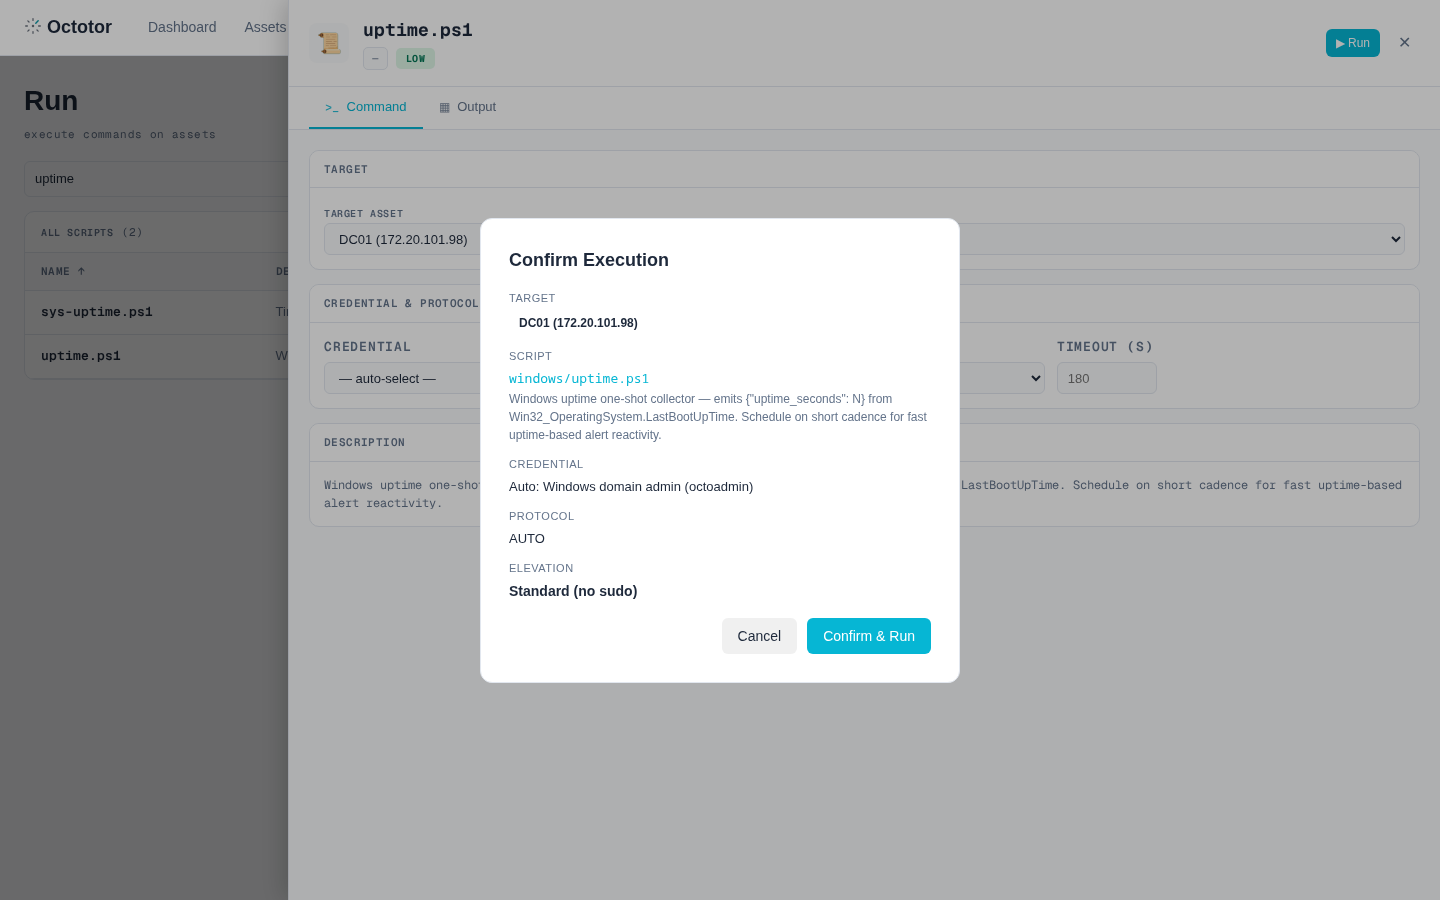
- Type uptime in the search box. The list may show more than one match — click the one named exactly uptime.ps1.
- In the panel that opens: under Target asset, pick your DC. Leave Credential on auto-select — it picks the OS-default credential from Step 8. Protocol: if the DC uses WinRM, leave it on Auto — Auto means WinRM for a Windows computer. If you manage the DC over SSH instead, select SSH.
- Click ▶ Run (top right of the panel).
- A Confirm Execution window summarizes what is about to run, on which machine, with which credential. Review it and click Confirm & Run.
- The panel switches to the Output tab and the result appears within a few seconds: the machine's uptime, the job status done, and the green Execution completed successfully banner.
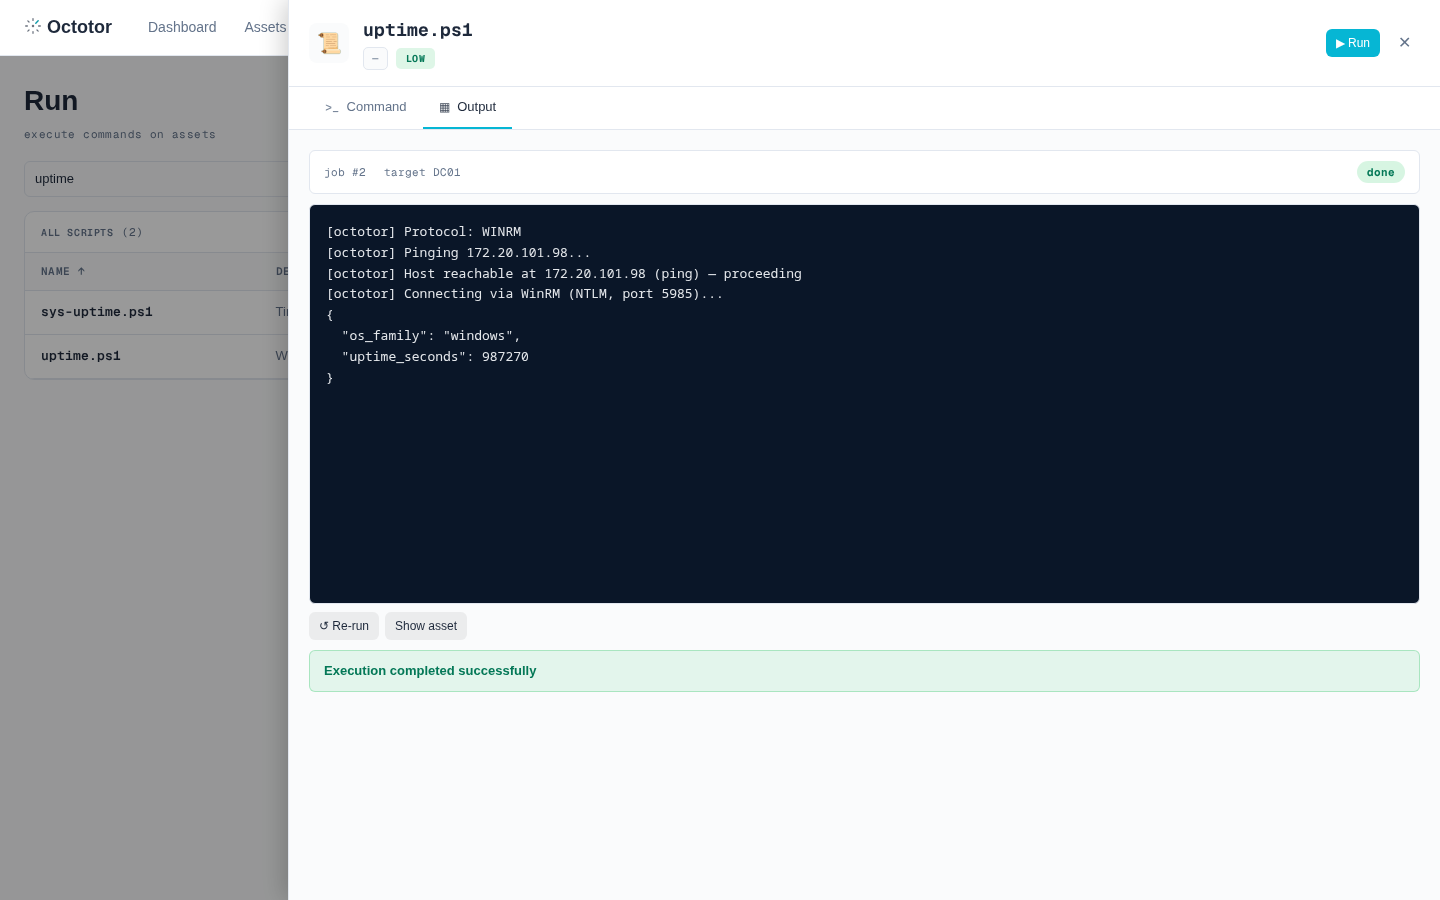
If the run fails, the output tells you which link of the chain broke: timed out — network path, or WinRM not enabled on the target · authentication failed — the credential · connection refused — WinRM/SSH not listening. Fix that link (the how-tos at the end of this guide cover enabling WinRM and SSH) and run again.
11Discover your computers from Active Directory — or import from a CSV file
Computers can be added to Octotor in three ways:
- Using a collector — a script that queries an external database such as Active Directory or Microsoft 365 Entra, and proposes what it finds for your approval.
- Manually, one by one, with the + Add button — as you did in Step 9.
- Bulk import from a CSV file.
Option AAdd computers from Active DirectoryTour
The collect-ad-computers.ps1 collector reads the computer list from AD (it changes nothing there), and everything it finds appears in Octotor for your approval — you decide what gets in.
- Open Run, search for collect-ad, click collect-ad-computers.ps1.
- Target asset — your DC. Click ▶ Run, confirm, and wait for the same green success banner as in Step 10.
- Open Assets and click Discovery (top right).
- The Discovered Identities panel opens on its Pending tab — one row per computer found in AD.
- Tick the computers you want to manage (or the header checkbox to select all) and click Approve Selected.
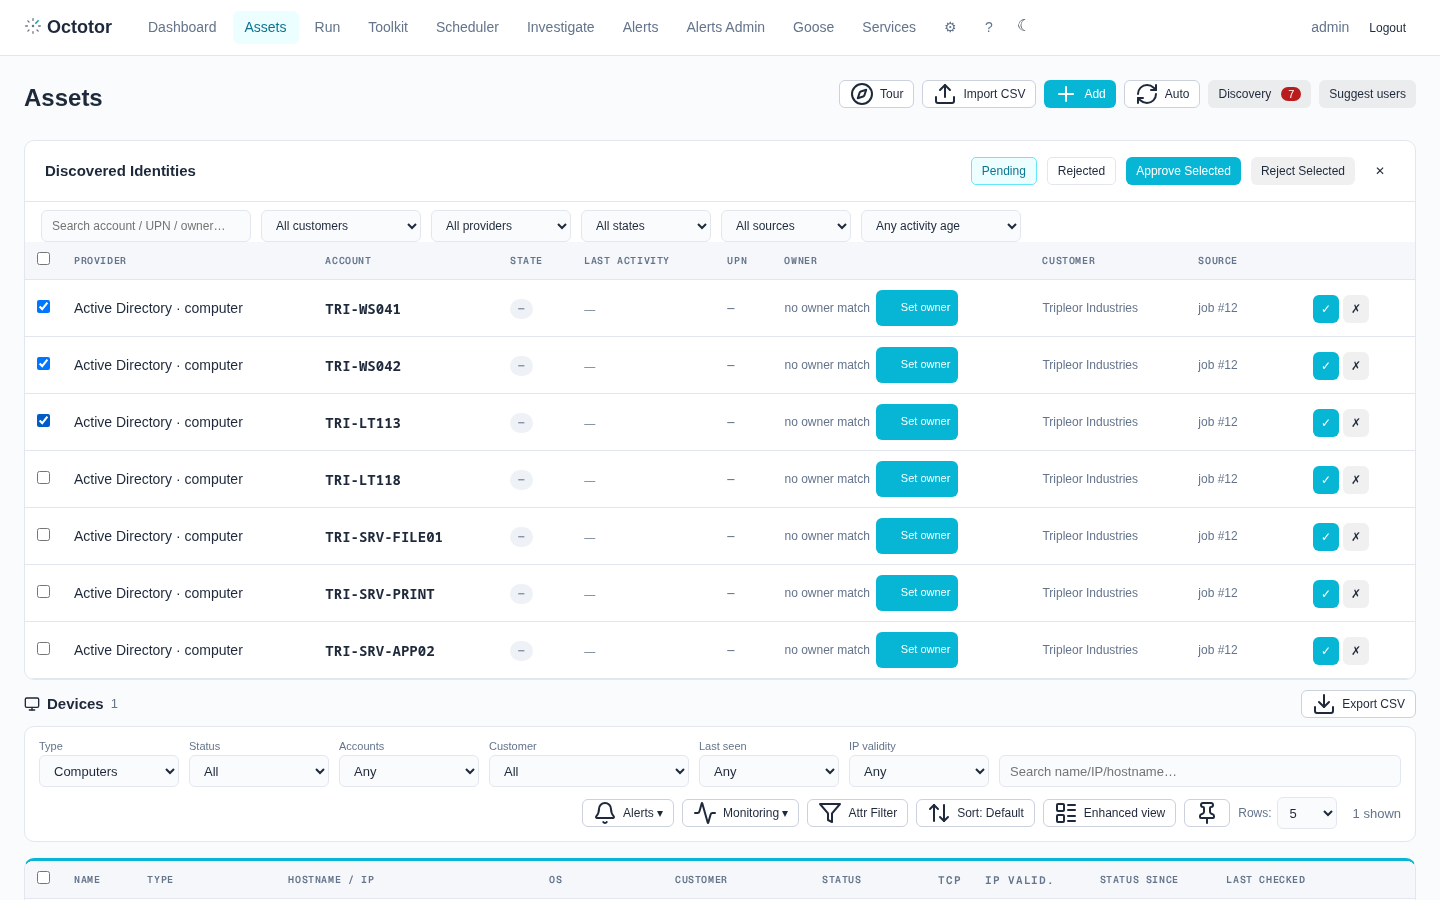
Approved computers appear in the Devices list as real assets, with their AD details attached. The Post-Setup Guide shows how to schedule this discovery to re-run automatically, so computers that join AD later keep flowing in.
Option BImport computers from a CSV file
Create the file in Excel (or any spreadsheet) with one row per computer and these columns, then save it as CSV:
| A | B | C | D | E | |
|---|---|---|---|---|---|
| 1 | name | type | ip | hostname | os |
| 2 | TRI-WS041 | computer | 172.20.101.41 | tri-ws041.tripleor.demo | Windows 11 Pro |
| 3 | TRI-LT113 | computer | 172.20.101.113 | tri-lt113.tripleor.demo | Windows 10 Pro |
| 4 | TRI-SRV-FILE01 | computer | 172.20.101.10 | tri-srv-file01.tripleor.demo | Windows Server 2022 |
Notes on the columns: type is computer for computers (other accepted values: user, switch, firewall, other). os is free text — Octotor reads it to work out whether the machine is Windows or Linux. Column names exported by common admin tools (CN, DNSHostName, IPv4Address, OperatingSystem) are recognized automatically, so an export from another system usually imports as-is.
Then import the file:
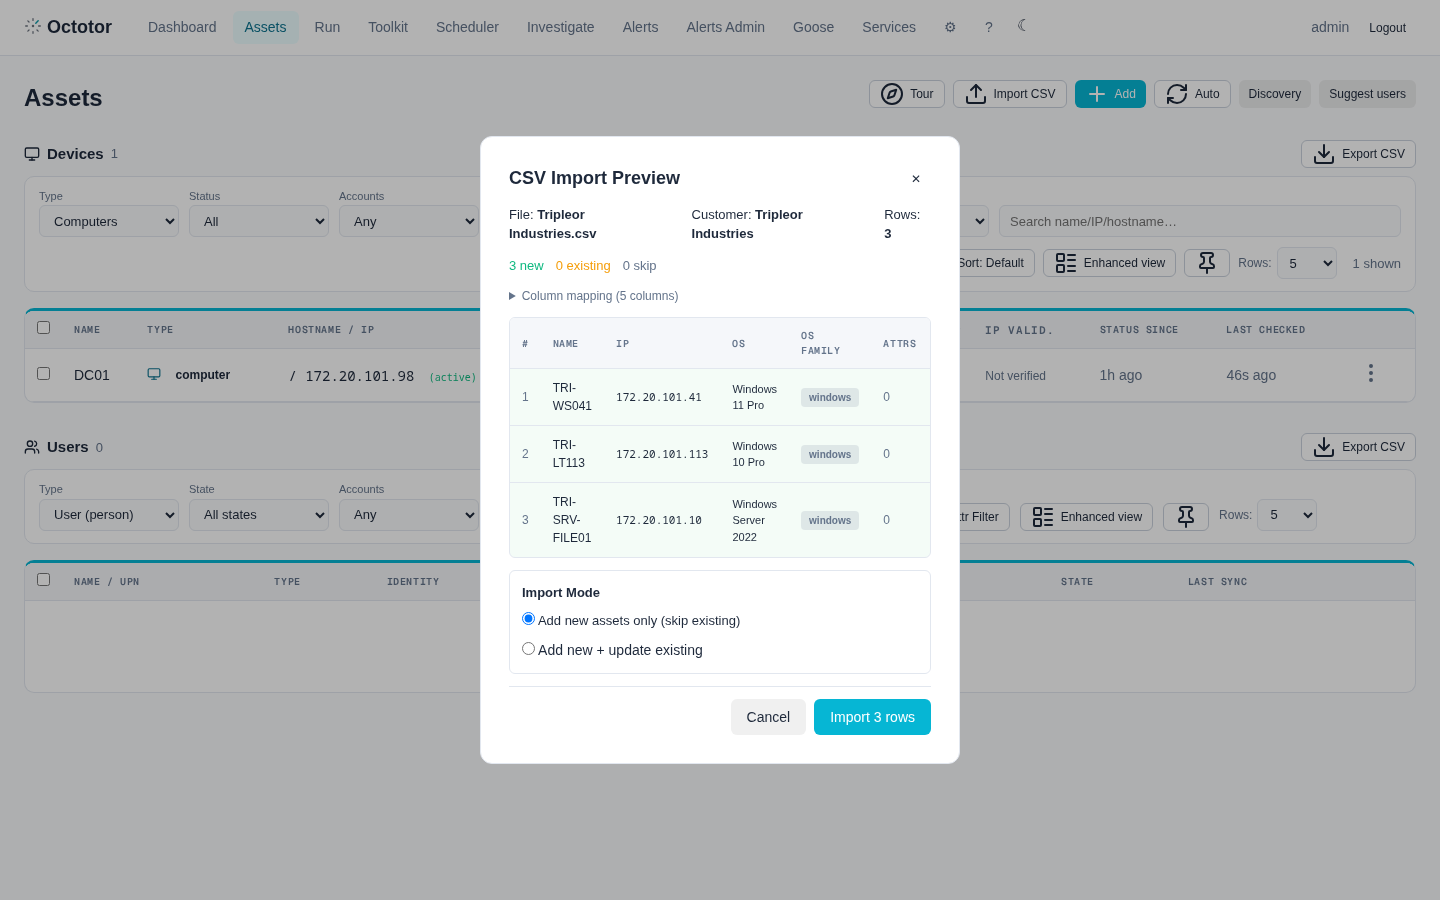
- Name the file after your customer (e.g. Tripleor Industries.csv) — the import assigns the computers to the customer named in the file name, and the preview shows which one that is.
- Open Assets and click Import CSV (top right).
- Choose your file. The CSV Import Preview opens — it shows exactly what will be created, row by row, and nothing existing is overwritten.
- Check the customer name and the rows, then click Import.
To add computers from other third-party sources — Microsoft 365, Check Point objects and similar — see the product Help (the ? button in the app). Dedicated guides will follow.
12Collect the details of one computerTourTour — view the result
The collect-info script visits a computer and records what's there — hardware, disks, memory, network, software. Run it once, by hand, on one computer, so you see the whole thing work before automating it in the Post-Setup Guide.
- Open Assets and pick a computer whose Status column shows a green ONLINE. (Online means the machine answered Octotor's last ping — Octotor checks all assets on a cycle. A machine that is switched off or unreachable shows OFFLINE or UNKNOWN, and a script cannot run on it.)
- That computer also needs WinRM enabled — same requirement as in Step 9 (how-to).
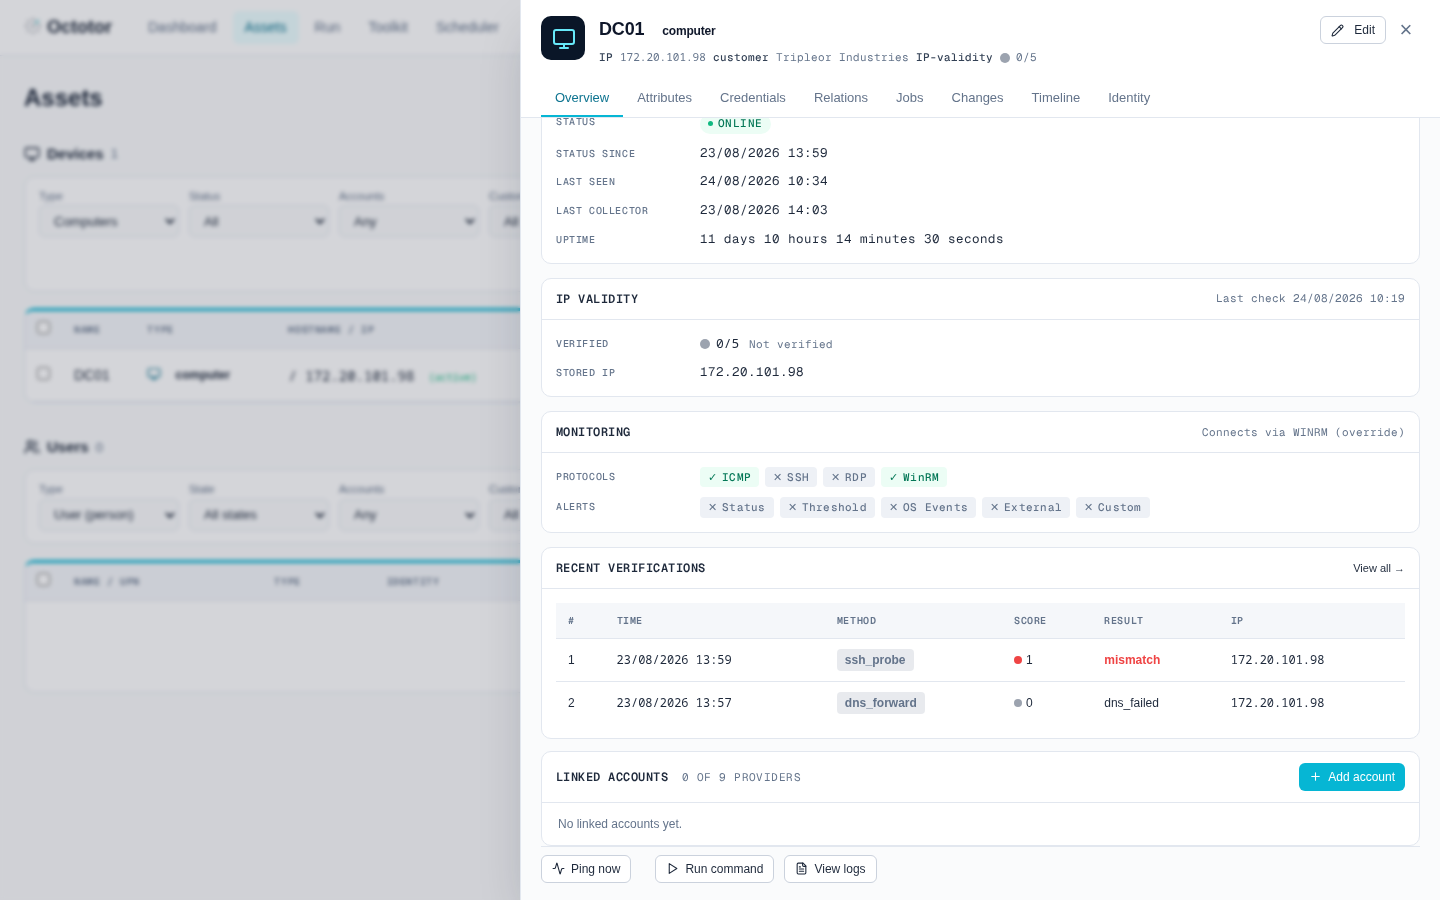
- Click the computer's name — its details panel opens. Scroll to the bottom of the panel and click Run command.
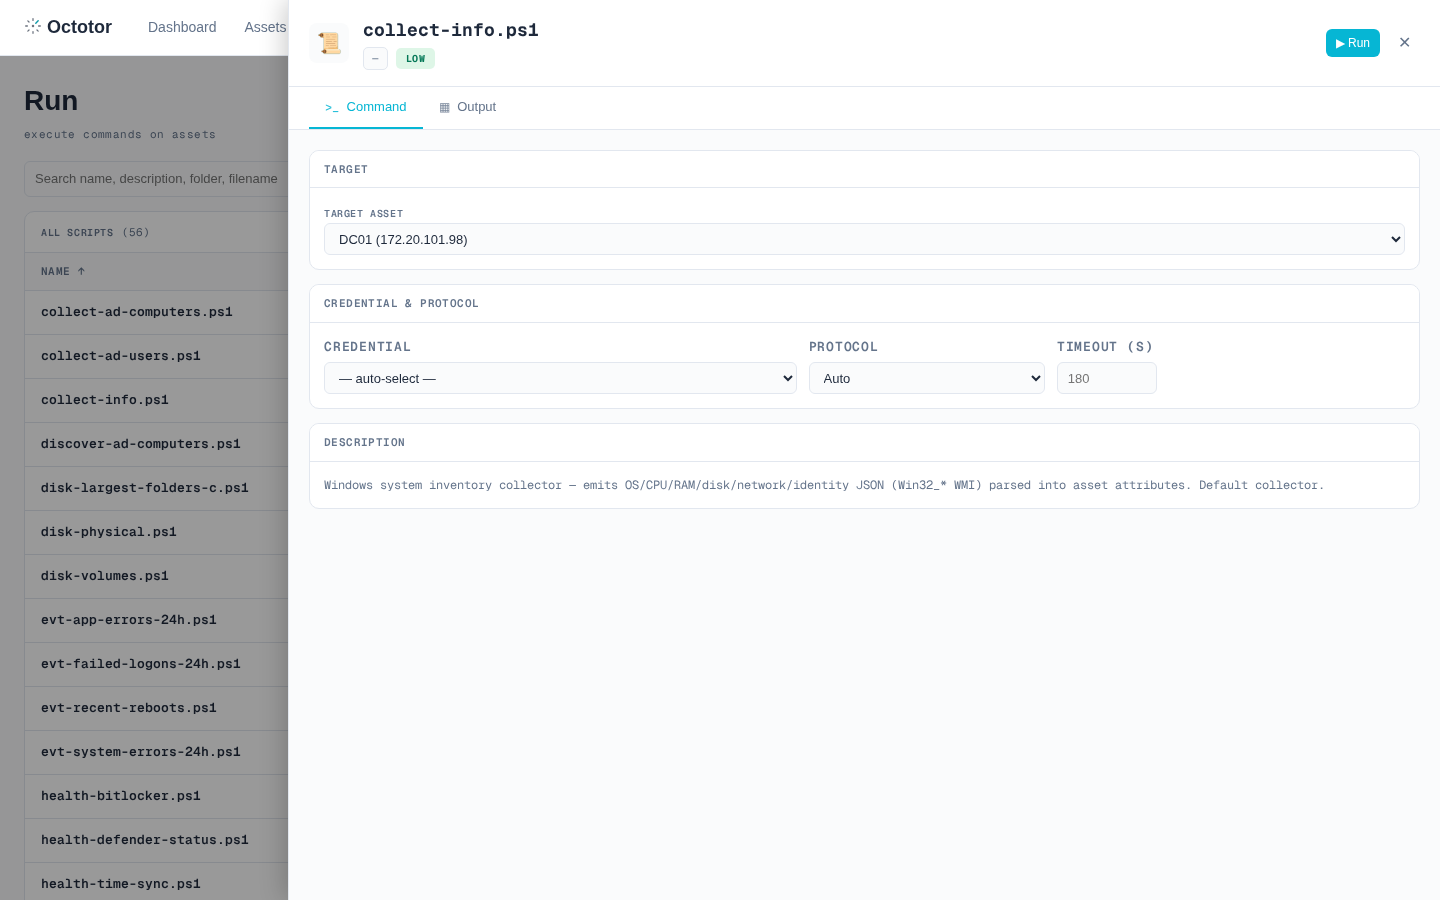
- The Run page opens with that computer already selected as the target, and the script list limited to scripts for its operating system. Click collect-info.ps1 (for a Linux machine: collect-info.sh).
- Click ▶ Run, confirm, and wait for the green success banner — same flow as Step 10.
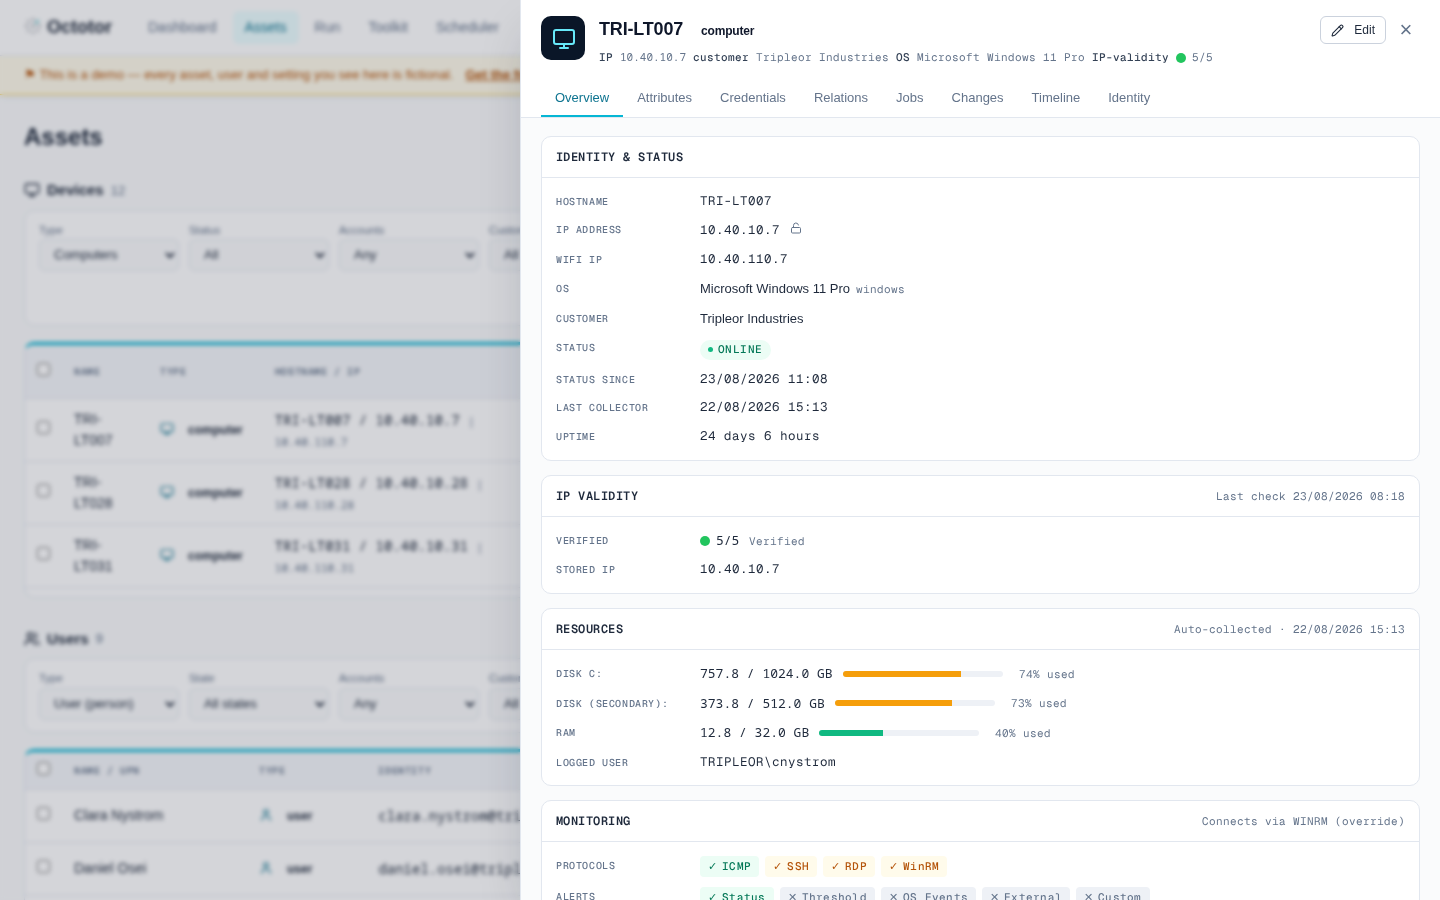
- Now look at what it gathered: back on Assets, click the computer's name again — the Overview tab shows status, disks, memory and the logged-in user; the Attributes tab lists everything collected.
Enable WinRM on Windows
One Group Policy Object on your Domain Controller switches WinRM on for every domain computer at once — full screenshot walkthrough, plus a test-only one-command shortcut: Enable WinRM with Group Policy →
Enable SSH on Windows
Three PowerShell commands turn on the built-in OpenSSH server — install, start, open the firewall (wide, restricted to the Octotor server, or for Tailscale): Enable SSH on a Windows computer →
The checklist
Tick these and setup is complete:
- Installed with Verified OK (Steps 1–3)
- Logged in; license active; admin password changed (Steps 4–6)
- Customer created with DNS settings (Step 7)
- Windows + Linux credentials, set as OS defaults (Step 8)
- First computer added and ONLINE (Step 9)
- uptime.ps1 on the DC — success banner, the chain works (Step 10)
- Computers discovered from AD or imported from CSV (Step 11)
- One computer's details collected and viewed (Step 12)
Then continue with the Post-Setup Guide: schedules, monitoring, alerts, notifications, and access lockdown.